Friday, April 30, 2010

Weekend Cocktails - Mint Julep


It's Kentucky Derby weekend!  And for Derby Day, mint juleps are definitely on the menu, with somewhere around 120,000 of the minty sweet bourbon drinks served over the two days at Churchill Downs, though Louisville locals will tell you that it's really a tourist thing. Doesn't matter. Like the big, brimmed hats that have found their way into tradition, so has the drink, and while Georgia says it was the originator of the Mint Julep, Kentucky lays claim to its popularity for that reason. Despite all that, in the summer's evening and dripping heat and humidity along these Gulf Coast states, you're bound to find somebody, somewhere, consuming a julep, and almost every southern state has its own way of making them.

Here's the basics:
  • Start with an ice cold glass - use a traditional silver julep glass, old fashioned, Collins, or a highball glass, and either jiggle with cubes to get it good and cold, or freeze it before mixing.
  • Always use fresh mint and use the top, more tender leaves, stripping them off of the stem.
  • You don't have to use your best aged whiskey, but use a good bourbon - 86 to 90 proof.
  • Use shaved ice or crushed ice, never ice cubes.
  • After a gentle muddle of the mint leaves, add a pile of ice and shove a straw into the glass right into the sweetened mint, cutting the straw off right above the rim so that it is short. Add the liquor, and the remaining ice, and touching only the top or bottom rim of the glass, stir vigorously until heavily frosted.
  • Garnish with a nice sprig of mint, positioned right at the straw, so that you inhale the essential oils of the mint every time you sip.
Enjoy.
Photos from istockphoto.com


Share

Mint Julep

From the Kitchen of Deep South Dish

Makes 1

1 dozen fresh mint leaves, plus a few sprigs for garnish
2 tablespoons of simple syrup
2 ounces of Bourbon
1 ounce of Dark Rum
Crushed ice

Chill a traditional silver julep glass, old fashioned, Collins, or highball glass by placing into the freezer, or jiggling some ice in the glass. Remove ice and lightly muddle the mint and simple syrup together in the bottom of the glass.  Top with some of the ice. Stick a straw all the way through the ice to the bottom of the glass where the mint is, then cut the straw off short, just above the top of the glass. Top the ice with the bourbon, then the rum, the remaining ice, and holding the glass along the bottom or top edge, stir vigorously, until the outside of the glass is heavily frosted. Garnish with a sprig of mint right next to the straw so that you get a nice whiff of mint with each sip.


Mint Julep Martini
From the Kitchen of Deep South Dish

Makes1

One dozen mint leaves
1 tablespoon of simple syrup or confectioners sugar
2 ounces of Bourbon
2 ounces of Triple Sec
Generous splash of Vodka
Ice cubes
Mint sprigs for garnish, optional

Put the mint leaves into the bottom of a cocktail shaker. Add the simple syrup and lightly muddle the leaves a few times to release the oils of the mint. Add the bourbon, triple sec, vodka, and the ice cubes and shake until well chilled. Strain into a martini glass, garnish if desired and serve immediately.

Can substitute 1 to 2 teaspoons of a clear creme de menthe for the fresh mint leaves.


Skinny Julep
Adapted from The Skinny Girl Mint Julep
From the Kitchen of Deep South Dish

Makes 1

1/4 cup of Gin
1/4 cup of Club Soda
12 mint leaves, plus a couple sprigs for garnish
1/2 tablespoon honey or other sweetener
Crushed ice

Loosen honey by microwaving on high for about 10 seconds.  In the bottom of a cold glass, gently muddle the mint leaves. Add the gin, club soda and honey; stir and top with crushed ice. Garnish with sprig of mint.

Source:  http://www.deepsouthdish.com

Click here for more adult beverages in the Weekend Cocktail Series.
~
Bookmark and Share

Thursday, April 29, 2010

Grilled Chili Lime Drumsticks

Chili Lime Drumsticks
This recipe was inspired by the Crispy Ginger Lime Chicken Thighs in the newest Everyday Food, Fresh Flavor Fast cookbook from Martha Stewart. I added the chili aspect to it from a recipe I had seen last year in All You magazine, married the two concepts and came up with this.

This is a wonderfully flavorful chicken marinade that could be used for wings, thighs, drumsticks, a spatchcocked or a whole cut up chicken and will work either for the grill or the oven.  I have to say that I was highly impressed with my new grill for my first skin-on chicken - no major flare ups!  Gotta work a bit on temperature regulation, but that'll come in time and learning the exact hot spots on the grill. This is a way bigger grill than my previous ones so I'm like a kid in a candy store, though I am no grill aficionado y'all. Rather I look at a grill as an extension of my oven and stovetop, that just happens to live outside! I'll leave the real grillin' to the experts.

The flavor combination of lime, with fresh garlic, ginger, chili powder and just a touch of McCormick's red curry powder was amazing.  The red curry is a blend of coriander, cumin, chili pepper, red pepper, and cardamom, that I absolutely adore. It is superb in a stir fry and worked extremely well here in this dish. Enjoy.

Share

Grilled Chili Lime Drumsticks
From the Kitchen of Deep South Dish

3 pounds of chicken legs

Marinade:

Juice of 2 limes
2 garlic cloves, finely minced
1 tablespoon of grated fresh ginger
1 tablespoon of chipotle chili powder
1 teaspoon of red curry powder
1 teaspoon sugar
2 green onions, sliced

Place the chicken into a zipper storage bag.  Combine the marinade ingredients and pour over the chicken; let rest for 30 minutes.  Preheat the grill to high. Reduce to medium high and cook the chicken over direct heat, turning several times, for about 20 minutes total or until juices run clear when pierced and the internal temperature registers about 165/170 degrees on an instant read thermometer.

Can also be cooked under the broiler, turning several times for a total of about 14 minutes or until done, or baked at 350 degrees for about 40 to 45 minutes or until done, turning often.

Source: http://deepsouthdish.com

Requires Adobe Reader - download it free!

Check These Out Too!

Spicy Ginger Garlic Chicken
Spicy Sweet Bacon Chicken Breasts
Grilled Hot Dogs with Cajun Hot Dog Sauce
.
Bookmark and Share

Tuesday, April 27, 2010

My Offerings for Cinco de Mayo


Share

Wow, it's right at the end of the month already isn't it?  Cinco de Mayo and Mother's Day are both right around the corner!  For Mother's Day, and from someone who cooks ALL the time, here's my menu for Mother's Day. Take your mother (or wife if that applies) OUT to eat to a very nice restaurant!  As far as Cinco de Mayo, my menu suggestions may be pretty far from anything authentic and more like Tex-Mex meets the Keys, but that's okay, because it's a menu I like and I hope you do too. For a few more Tex-Mex offerings pop over to this link and scroll the page.

I have fallen in love with sangria - how can you not love a mixture of wine with seasonal fruit! This is a sassy blend of Mondavi Woodbridge Chardonnay with pineapple and lemon juices, and slices of fresh strawberries, oranges, lemons and chunks of Gala apples. It just tastes spring y'all! Why not start with one of these?


Or maybe you're more of a Mojito kind of person. Fresh lime juice, muddled mint fresh from your garden, and a good rum, I know I love them and they are just perfect for this time of year.


Course there has to be some quick dips scattered about for guests to dive into.  How about some of this yummy jalapeno popper dip as a starter? It's like a deconstructed jalapeno popper. I love it!


This classic dip has been around since the 70s but it's as big a hit as it ever was. I don't think I've ever been to a party where this dish wasn't wiped clean. It's a party favorite!


Or maybe you're a purist and you prefer the jalapeno poppers themselves? Don't buy the frozen, store-bought kind when you can make them so easily at home.  These are delicious and super easy to make ahead, but gotta warn ya... a bit addictive. Make lots!


Maybe you like a soup to start? This one is nice and spicy and feeds a crowd!


A taco bar is an ideal lineup for Cinco de Mayo and this shredded beef makes a wonderfully flavorful and authentic beef taco. The meat is amazing! Set up a station with all the favorite toppers - freshly chopped tomatoes, chopped avocado (lightly tossed with lime juice), fresh sweet onions, shredded white and yellow cheeses, shredded lettuce, sliced black olives, sour cream and fresh salsa.


Burritos are always a winner and made from scratch and fresh from your kitchen, I think these have a wonderful flavor combination you'll love. Make them ahead into minis if you like and wrap them in foil to freeze them now, or make them the day before and line them up on a baking sheet and refrigerate. Your guests will not be disappointed.


I love these tasty white chicken enchiladas for a change of pace and much of the work for these can also be done ahead.  If you prefer, use your favorite red enchilada sauce instead.


Feel like breaking out the grill? These Grilled Chili Lime Drumsticks are a new favorite of mine that I've adapted from the brand new, Martha Stewart cookbook, Everyday Food: Fresh Flavor Fast. I think they've got just the right kick to be included here!


Migas are good anytime - breakfast, brunch, lunch or party! Fast and easy to make up a batch too.


Of course, one of the traditional desserts of Cinco de Mayo is this milky Tres Leches Cake. A sponge cake of sorts, drenched in three milks - in this case, sweetened, condensed milk, evaporated milk and half and half - it is a definite favorite of many. Dress it up with a bit of assorted sliced fruit!


Or, after all of that spicy goodness, how about some nice, tender cookies to cool things down a bit? These are my Mama's cookies that we make traditionally around Christmas time shaped into a roll, but shape them into circles and it's the same basic Mexican wedding cookie. These will melt in your mouth.


Maybe a slice of this delicious pie will help cool things down?  A combination of cream cheese, condensed milk and Key Lime juice, nestled in a graham cracker and coconut crust and topped with homemade minty whipped cream.  Why not?  Refreshing.


~
Bookmark and Share

Saturday, April 24, 2010

White RO*TEL Dip

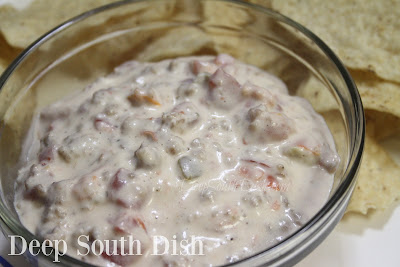
A spicy sausage dip made with Monterey Jack cheese, cream cheese and spicy tomatoes.

White RO*TEL Dip

This is another great dip for keeping your guests at bay while you cook out, for football night, your next party, or simply for movie night in with the family. We keep it warm in the crockpot and scoop out single servings into small custard bowls with white corn tortilla chips on the side. Use regular sausage, bump it up with a spicy version, substitute regular, cooked ground beef, or try it with small, cooked shrimp.


Bookmark and Share

Friday, April 23, 2010

Crockpot Carolina Style Barbecue Pork


This Carolina Style Barbecue Cheater Pulled Pork recipe came about when recently, I posted over on Facebook a slow, stovetop simmered, cheater pulled pork I learned last summer. It is done on the top of the stove, and produces an incredibly flavored pork The Cajun and I instantly fell in love with. Several Deep South Dish Facebook family members reported they did a similar pork using their crockpots.  Well, y'all talked me into investing in a new slow cooker {since the one I owned is at least... ahem... 33 years old} and the first thing I set my mind to doing was some kind of pork barbecue.

I pulled out one of my old slow cooker cookbooks and started off with the intention of doing a plain pulled pork, and then remembered a couple others on Facebook had mentioned Carolina barbecue pork, so I switched gears mid-stream. I found a basic recipe on the Crockpot brand website, then did a bit of research and ended up with this recipe.  The seasoning that I put together would probably have made a great rub to marinade the pork with the night before, so I may try that next time, but I have to say, I loved the flavor when adding it after shredding the pork too. 

Now, first off before any Carolina folks get on me... I am a Mississippian and mostly we like a sweet and spicy, and wet, tomato based barbecue pork down here, so just like every other region of this country, our barbecue varies from other regions of the U.S.  Heck I even see that depending on where you live in the Carolinas barbecue pork is different! So, in other words, just as I'd never claim authenticity on my Italian Beef for Sandwiches, I'd also never be so bold as to say that this recipe is genuine, authentic, Carolina barbecue pork - only that it is Carolina inspired, since it is a vinegar and mustard based sauce.

I can tell y'all one thing.  This recipe may be different from what we do here in Mississippi, but it sure has just the right kind of tang for me for a change of pace. It is just downright delicious! Enjoy.

Share

Crockpot Carolina Style Barbecue Pork
From the Kitchen of Deep South Dish

2 medium onions, sliced, divided
5-7 pound pork butt, shoulder or fresh pork picnic ham
2 cups of water
5 whole cloves, optional

Seasoning:

1 large onion, chopped
2 tablespoons brown sugar
1 tablespoon paprika
1 teaspoon salt
15 turns of the pepper grinder
2 tablespoons of Liquid Smoke

Vinegar Mixture:

1 cup apple cider vinegar
4 teaspoons Worcestershire sauce
1 teaspoon red pepper flakes
1-2 tablespoons of brown sugar, or to taste, optional
1/2 teaspoon dry mustard
1/2 teaspoon garlic salt
1/4 teaspoon Slap Ya Mama, or your
   favorite Cajun seasoning

Hamburger buns
Coleslaw, store bought or homemade, optional
Sliced pickle, optional

Slice one onion and place into the bottom of the crockpot. Add water and cloves. Add pork and top with remaining onion slices. Cook overnight, or for 8 to 12 hours, on low.

Carefully remove pork from crockpot and set aside to cool just enough to handle. Drain off liquid from crockpot, except strain and reserve 2 cups. Cut up the meat from the pork and return to the crockpot. Add the chopped onion and sprinkle with the brown sugar, paprika, salt and pepper and stir well. Combine the liquid smoke with the reserved broth, and add to the meat.

Combine ingredients for vinegar mixture - vinegar, Worcestershire, red pepper flakes, brown sugar (to counter some of the tartness only if desired), dry mustard, garlic salt, and Cajun seasoning; pour 1/2 of the vinegar mixture over the meat; stir well.  Cover and cook on low for 4 to 8 hours, stirring a few times if possible. Place remaining vinegar in the refrigerator.

Serve meat on buns, drizzled with the remaining vinegar sauce, and topped with store bought or homemade coleslaw, if desired.  Add a side of baked beans.

Can freeze.

Leftovers? Build a BBQ Sundae!

Requires Adobe Reader - download it free!

Source: http://www.deepsouthdish.com

Check These Out Too!

Barbecue Sundae
Crockpot Barbecue Beef
Spicy Italian Beef for Sandwiches
Grilled Baby Back Ribs
.
Bookmark and Share

Tuesday, April 20, 2010

Cajun Hot Dog Sauce


I love hot dogs. I don't care how they are made, or what's in them, or the scary stories, nope, just don't even want to hear about all that, because I. Love. Hot. Dogs. They really are the best cooked on the grill in my humble opinion, and this yummy hot dog sauce only makes the experience better.


Now I won't go so far as to say this qualifies as anything near a Coney Island hot dog sauce, but it's sort of patterned after that following some goodly research, but of course I had to add a tad bit of Cajun flair with some Louisiana hot sauce and my near and dear to me Slap Ya Mama Cajun seasoning. Not at all like chili on a hot dog, and really sort of non-descript all on it's own, but marry the sauce with the dog and it's heaven, I tell ya!


Preheat the gas grill to high, oil the grates, stick the hot dogs on, reduce heat to medium, and cook over direct heat, with the lid closed, somewhere between 5 and 7 minutes, turning several times so ya don't burn the beejesus out of 'em. Course, some people like them like that and I'm not one to judge. Toast the buns, slip in a dog, spoon over some hot dog sauce, and embellish it with whatever you like. I happen to like mine done this way, with a bit of extra mustard, some raw onion and sweet pickle relish. Hello yum yum.


Share

Grilled Hot Dogs with Cajun Hot Dog Sauce
From the Kitchen of Deep South Dish

1/2 tablespoon of olive oil
1/2 cup of chopped onion
1 pound of ground beef
1/2 cup of ketchup
1/8 cup of Louisiana hot sauce
2 tablespoons of yellow mustard
1 teaspoon of Worcestershire sauce
1 cup of water
1 teaspoon of sugar
1/2 teaspoon of Slap Ya Mama, or your
   favorite Cajun seasoning, to taste
1/4 teaspoon of paprika
1/2 teaspoon of garlic powder
1/4 teaspoon of allspice
1/4 teaspoon celery seed
Couple pinches of kosher salt
About 10 turns of the pepper grinder
Light grating of whole nutmeg, optional
1 (1 pound) package of hot dogs
1 package hot dog buns
2 tablespoons of butter, melted
Garnishes:  Extra onion, chopped pickles,
   or pickle relish, extra mustard, ketchup

Heat olive oil in a medium sized skillet and add onion; cook until softened but not browned.  Add the ground beef and cooked until browned, breaking the meat up.  Drain and set aside.

To the same skillet, add the ketchup, hot sauce, yellow mustard, and Worcestershire sauce; stir in water and sugar and blend well.  Add the Cajun seasoning, paprika, garlic powder, allspice, celery seed, salt and pepper.  Grate about 3 passes on the microplane of whole nutmeg into the sauce, if desired. Bring mixture up to a boil, add the meat, reduce and simmer for about 30 minutes on medium low.

Meanwhile grill the hot dogs.  Brush the hot dog buns with a light layer of melted butter and toast on the upper rack of the grill.  Place hot dog in a bun, top with the hot dog sauce, and garnish as desired.

Source:  http://www.deepsouthdish.com

Requires Adobe Reader - download it free!

Check These Out Too!

Beans and Weenies
Yummy Hamburger Sandwich
Beefy Pizza Bread
Easy Beef Nachos
.
Bookmark and Share

Sunday, April 18, 2010

Mimi's Rotisserie Style Sticky Chicken

Sticky Chicken

From the Kitchen of Deep South Dish
Published: April 18, 2010

There must be a hundred sticky chicken recipes on the internet for how to make a homemade rotisserie chicken, every one different from what I consider to be the original sticky chicken - Mimi's.

Several years back when I had a few extra mouths to feed and was working more than full time, I did the once a month freezer method of cooking. This sticky chicken was one of the most popular chicken recipes back then to make ahead and reserve the meat for casseroles. It's one of the carryovers I have held onto all these years, and that I still love today.

Even this original sticky chicken recipe has taken on a life of its own across the internet as often happens, but it is rarely credited to the original creator of it, Mimi Hiller, who came up with the seasonings and specific method back in the mid-80s.  The chicken slow roasts at 250 degrees for 5 hours.  Yes, you read that right - 250 degrees. 5 hours.  Which seems to frighten the heck out of some people. Ms. Hiller claims that it's safe however stating that "...anything over 225 degrees is safe as long as the chicken reaches an internal temperature of at least 155 degrees, (which this does, and more) for about 5 hours."
Still, I suppose that I should throw in a disclaimer here about how the federal government a/k/a the U.S. Department of Agriculture recommends cooking poultry at oven temperatures of 325 degrees or higher. So there. I told you. You should therefore proceed with this recipe with that knowledge.
The result of this slow roasting is an incredibly tasty chicken that is both infused with flavor throughout, but is also fall apart tender and juicy, and is somewhat reminiscent of the rotisserie style deli chickens that are so popular these days. I have made this chicken multiple times since those days back then and with absolutely no ill effects and I'm still around, however... if you have concerns about cooking at that low of a temperature, bump up your temperature and adjust the cooking time accordingly. The flavor from the rub will be great ... I just can't vouch for the same exact result. You'll want an internal temperature somewhere around 175/180 degrees, when an instant read thermometer is inserted in the thigh.

If you remember, put this chicken together the night before so that it marinates overnight with the seasoning rub, but I've forgotten and just roasted it immediately after applying the rub with excellent results too.  Grab an extra large chicken or do a couple of smaller chickens when you find them on sale and roast them to shred up and freeze for future meals.  This rub is so delicious, I'm thinking I might even spatchcock a chicken and try this rub on the ole grill.  It'll be a different experience than this, but I cannot imagine it would be anything but delicious.

This is just one of many ways to roast a chicken, but it is one of the best I've ever eaten. Don't limit the spice mixture to only roasted chicken - there are many applications it can be used for.  I'm thinking that it'd be a darned good blackening rub even, if I ever venture outside to smoke out my neighbors with a blackened dish out on the grill one evening. Enjoy.


Share

Rotisserie Style Sticky Chicken
From the Kitchen of Deep South Dish

1 (3 to 4 pound) whole chicken
1 medium onion, cut into chunks
4 teaspoons of kosher salt
20 turns of the pepper grinder
1 teaspoon of Slap Ya Mama, or your favorite
   Cajun seasoning, or to taste
1/2 teaspoon of garlic powder
1 teaspoon of onion powder
1 teaspoon of white pepper
2 teaspoons of paprika
1 teaspoon of dried thyme, crushed

Preheat oven to 250 degrees.  Remove giblets from chicken if it has them. Place the chicken into a roasting pan.

In a small bowl, mix together thoroughly the salt, pepper, Cajun seasoning, garlic powder, onion powder, white pepper, paprika and thyme and rub this mixture all over the inside and outside of the chicken. Cover loosely and refrigerate overnight if possible, to marinate. If you did not remember to do this, I've cooked them right away also and it is excellent.  If cooking right away, roughly chop the onion and stuff into the cavity of the chicken. If marinating overnight, wait to stuff the onion in the chicken until just before roasting.

Roast uncovered at 250 degrees for 5 hours.  After the first hour passes, begin basting the chicken with the pan juices periodically. The chicken is ready when the internal temperature is between 175/180 degrees when an instant read thermometer is inserted into the thickest part of the thigh.

Tip:  Roast two chickens at a time and reserve one for use in other dishes. Check out Ten Delicious Things to Do With a Rotisserie Chicken!
Disclaimer:  The U.S. Department of Agriculture recommends cooking poultry at oven temperatures of 325 degrees or higher. You should proceed with this recipe with that knowledge and at your own risk.
Source:  http://www.deepsouthdish.com

Requires Adobe Reader - download it free!

Adapted from a 1980s recipe by Mimi Hiller

Check These Out Too!

Oven Roasted Chicken with Butter Pan Sauce
Spicy Ginger Garlic Chicken
Spicy Sweet Bacon Chicken Breasts
Roasted Balsamic Chicken Thighs
.

Bookmark and Share

Saturday, April 17, 2010

Baked Spaghetti from Trisha Yearwood

A perfect potluck casserole, this one feeds a crowd! Using a basic tomato based spaghetti meat sauce as a base with layer of spaghetti noodles & cheese, finished with a cream soup topping.

Baked Spaghetti

Baked Spaghetti is a fantastic meal for any day, but most especially for feeding a crowd, making it perfect for potlucks, church suppers and socials.  This one has been a favorite around my house ever since the first time I made it. It comes from the cookbook Home Cooking with Trisha Yearwood, another favorite, and it is simply delicious. Check out the Hot Corn Dip I made from the new cookbook and the Warm Feta and Artichoke Dip I made from her first cookbook. For my review of her latest cookbook, click right here.


This baked spaghetti starts pretty much the same as with any spaghetti - boiling the noodles and putting together a meat sauce.  When I make spaghetti, I like to break up the noodles to make them more bite manageable, so I usually break them in half.  If you have little ones, you can break them down into another half. It just makes it much easier to eat, especially when it's in a casserole like this.

Trisha Yearwood uses black olives in the original recipe, which I happen to love but generally omit, since The Cajun doesn't like them and often, this dish is traveling for other people to eat. She also uses plain diced tomatoes, but I like the added punch of Rotel tomatoes, and often substitute them for at least part of the tomatoes, when a recipe calls for plain diced tomatoes. There are several varieties of Rotel available these days, depending on the heat level you prefer. Use a little additional beef broth if you need to loosen the sauce up more to make up the difference in the juices. From there it's just layering and then baking.

Here's how to do it.


Bookmark and Share

Friday, April 16, 2010

Southern Collard Greens with Ham Hocks and Hoecakes

Southern seasoned collard greens with ham hocks and served with hoecakes on the side.

Southern Collard Greens

Collard greens and ham hocks were just meant to be together in my opinion. I mean, is there possibly anything more southern than a big bowl of southern style collard greens, made with ham hocks and a couple of hoe cakes tucked into the corner of the bowl? I absolutely adore collards personally, and really, though you can use a few other types of meats to season them with, ham hocks rule.

The other day, I asked The Cajun to make a pit stop by the market on his way home, and he just happened to pass by his Mama's and the Winn Dixie store. Well, lo and behold, Winn Dixie just so happened to be having a 2 for 1 special on collard greens, so in he walks with this armload, and I mean ARMLOAD full of 4 huge bundles of collard greens.  Collard greens are in season right now down here and plentiful and I am telling y'all, that man cannot pass on a bargain!  Well, I recently had a reader request for hoe cakes anyway, so I bumped that up to enjoy some of those with this new found bounty of collards that had just walked into my door!

Now, I confess, I love greens, but ... I am the only one in this house who will eat them, which really makes the whole thing about The Cajun bringing home this big bundle of collards funny - he will not touch collards! While there are a few veggies I manage to get into him {and a few I sneak into him}, bottom line is that he is simply a meat and potatoes man.  So, it is a rare thing for me to make greens from fresh, because frankly, it is a bit of work for just one person. Over the last few years, while I have ventured outside of the frozen box, I've pretty much kept it simply to mostly a few seasonings and sauteed down in some bacon. Time to kick it up a notch! Be sure to check out these fantastic suggestions and tips from the amazing folks at our Facebook page too!

I was using ham hocks for seasoning, so first I got those going to season the water for the greens.  You can use other smoked meats - neck bones, turkey legs, ham and good ole bacon are very common.  I covered the ham hocks with water plus about another inch, then added salt, Cajun seasoning, onion, garlic, and a couple dashes of hot sauce. Bring to a boil, then reduce heat and simmer for an hour.


Bookmark and Share

Wednesday, April 14, 2010

Southern Hoe Cakes

A classic southern recipe, cornmeal hoecakes are little pan fried cornmeal medallions that are at home as breakfast, as much as they are as a side dish with a mess o' greens, and just about anything else!

Southern Hoecakes

A hoe cake, or hoecake, also known as Jonnycakes, is a sort of fried cornmeal flatbread - kind of like if you took cornbread batter and skillet fried it like a pancake. The inside puffs up like cornbread, while the outside gets nice and crispy from frying it in the oil. It's the perfect companion to a mess o'greens, or for breakfast or as a sweet treat when drizzled with a bit of syrup.

I read that hoecakes likely started with Native Americans who apparently cooked these on hot rocks inside an open fire. The method was later adapted by cooking the bread on the blade of a hoe, and that is how it got its name.

This was a reader request from one of our Facebook family members Sarah, and since The Cajun brought me home a literal armload of collard greens, I thought I would bump up the request since I clearly had greens in my near future ... and everybody knows, you gotta have either cornbread or else some hoecakes to go with!  Course these little hoecakes are pretty good all on their own too.

When it comes to Hoecakes, I think the Lady & Son's Restaurant - of the Miss Paula Deen the Queen of Southern cookin' in Savannah - does them up best. This is a slight adaptation of Paula Deen's Hoecake recipe, a signature feature at the restaurant that comes to your table like a bread basket elsewhere, and the one I love. I think it makes a just perfect hoecake for sopping up some pot likker from a big ole pot of greens, though they make a great bread dish for just about any meal really, especially in the heat of the summer when you want bread but don't want to turn on the oven.

The batter can be made up and stored in the fridge for a couple of days, since we all know as those greens set up in the fridge, they don't get nothing but better. Or treat yourself and drizzle a bit of maple syrup over one. Yummy.

The sugar is optional. I like it in these, but leave it out if you don't.  Now, if you like and you have a well seasoned cast iron skillet, you can skip the oil or butter to brown them, but you won't get that lovely, crispy outside either, so really, why would you want to do that? Just look at that crispy loveliness with a drip of maple syrup on it, would ya?


Pin It
Share

Recipe: Southern Hoecakes

©From the Kitchen of Deep South Dish
Prep time: 10 min |Cook time: 20 min | Yield: About 10 (5 servings)

Ingredients:
  • 1 cup of self rising flour
  • 1 cup of all purpose cornmeal
  • 2 teaspoons of baking powder
  • 1/2 teaspoon of salt
  • 1 tablespoon of sugar, optional
  • 2 eggs
  • 3/4 cup buttermilk
  • 1/3 cup water
  • 1/4 cup of canola oil
  • 1 tablespoon of canola, for frying, or canola combined with a bit of butter
Instructions:

In a medium bowl, whisk together the flour, cornmeal, baking powder, salt and sugar. Measure out the buttermilk in a liquid measuring cup, and add to that the water and oil; blend well. Add eggs and mix well. Heat oil and butter in a cast iron skillet over medium to medium high and drop batter by about 1/8 cup measures into the hot skillet to form small medallions.

Fry until brown and crisp, turn and brown the other side. Remove and let drain on paper towels. Serve immediately with warm maple syrup for breakfast or as a snack, or dip 'em in a mess o' greens to sop up that pot likker (juice from the greens)!

Variation: When corn is at peak and in-season, add about 1 cup of corn cut and scraped off the cob. You'll need about 1 large ear of corn. Can also make this into a pan hoecake. Add only enough buttermilk to make a stiff batter. You may not need the additional water. Pour into a screaming hot, well greased 8-inch cast iron skillet over medium high heat. Reduce heat and let brown underneath about 10 - 15 minutes. Run a metal egg turner underneath and turn to brown the other side.  Can also bake in a well preheated 425 degree F oven for about 15 to 20 minutes (no turning needed).

Tip: If you spray the measuring cup with a bit of non-stick spray before scooping, the batter will slip right out.  If you don't happen to have that 1/8 cup measure, just do about 2 tablespoons of batter in one pile and push it around to form a medallion.

Source: http://deepsouthdish.com

Requires Adobe Reader - download it free!

Requires Adobe Reader - download it free!

©Deep South Dish

Adapted from a Paula Deen recipe

Check These Out Too!

Southern Skillet Cornbread
Basic Hushpuppies
Parmesan Garlic Toast

Posted by on April 14, 2010

Images and Full Post Content including Recipe ©Deep South Dish. Do not repost elsewhere without explicit permission. All rights reserved.
.

Bookmark and Share

Monday, April 12, 2010

Hot Corn Dip

Hot Corn Dip made with Mexicorn, green chilies, jalapenos, Monterey Jack and Parmesan cheeses, and red pepper flakes, is terrific served with corn chips or tortilla chips.

Hot Corn Dip

This Hot Corn Dip recipe from Trisha Yearwood, is one of the most popular posts on my site since I posted it. And for good reason - it is downright yummy! Y'all might have read my previous post where I got a craving for Trisha Yearwood's Hot Corn Dip when Trisha made an appearance on The View to promote her newest cookbook, Home Cooking with Trisha Yearwood.

I am a fan of Trisha Yearwood anyway - matter of fact, make her hair brown and I swear she looks like my sister - and, I already have her first cookbook, Georgia Cooking in an Oklahoma Kitchen, which I love and why I was considering the newest one anyway, but I think I love this one even more. I suspect y'all will be seeing a few of her recipes show up here at some point. Beautiful photography, some great family stories, if you are a lover of southern foods and/or a collector of cookbooks like I am, you'll want Home Cooking. Check out my review of Home Cooking if you missed this one!


Bookmark and Share

Sunday, April 11, 2010

Southern Style Green Beans with New Potatoes

Classic southern style green beans made with potatoes, and seasoned with bacon and onion.

Southern Style Green Beans with New Potatoes

Southern style green beans, whether made alone with sauteed onion and bacon, or with the addition of potatoes as here, are a well loved side dish in this part of the country. When fresh green beans are at peak in my garden, or in season at the grocery store, those are what I prefer to cook. But when I run out of those or when it's off season, frozen or canned green beans are a perfectly acceptable substitute. The ones pictured above are actually fresh beans from my garden that I froze! If using fresh or frozen beans, be sure to saute them in the cooked bacon and onion for a bit first, then add the potatoes and enough chicken broth to the pot to cover.

I love fresh, whole green beans, lightly steamed with just a bit of butter, salt and pepper, but occasionally we really enjoy them done this way. You can also omit the potatoes. Amounts given are just estimates - use more or less according to your taste. Here's how to make them.


Bookmark and Share

Saturday, April 10, 2010

Warm Feta and Artichoke Dip


This Warm Feta and Artichoke Dip started with Whoopie Goldberg on The View.  If you ever watch the show, or know much about Whoopie, you know that she says she is a bit particular about what she eats. Well, when Trisha Yearwood was on The View this week promoting her newest cookbook, Home Cooking with Trisha Yearwood, she, of course, had some of her featured dishes on the table in front of the couch.  Whoopie picked up this Hot Corn Dip from the table and was raving about it, wanting everybody to try it. I was already considering the purchase but before the segment was over, I had ordered the new cookbook. I am such an easy sell when it comes to new cookbooks.

Anyway, by then I had a taste for a dip - I am also easily influenced by the suggestion of certain foods - and remembered this one from Trisha's previous cookbook, Georgia Cooking in an Oklahoma Kitchen. I pulled it off the shelf and happened to have everything on hand to make this dip, while I waited to pick up what I needed for the Hot Corn Dip and for my new cookbook to arrive.


Bookmark and Share

Friday, April 9, 2010

Step by Step Homemade Mississippi Roast Beef Po'Boy with Gravy

Mississippi Style Roast Beef Po'boy - Dressed and Pressed

Roast Beef Po'Boy with Gravy

From the Kitchen of Deep South Dish
Published: April 9, 2010

Po'boys are the mysterious sandwich of the south for sure.  Over here in Mississippi we make ours just a tad bit different than our sister state, Louisiana. We have this whole "dressed and pressed" thing we like over this way.
You can read more about what exactly a po'boy is, along with a mild southern style hissy fit about what a po'boy is not, right here.  I won't rehash all that here.

I recently had a Twitter request for how to make a Mississippi roast beef po'boy start to finish. Besides the general post about what a po'boy is, I have posted how to construct an oyster po'boy, and also an old Mary Mahoney's favorite of mine, a Denver po'boy. I have a shrimp po'boy coming too, but roast beef is the king of po'boys, and has been on my list of things to document, and I finally got around to it ... so Osmar from Brazil, this is for you! It may not be identical, but I hope that it at least reminds you of the ones you had at Pirate's Cove in Long Beach, Mississippi.

Two things, first thing. Be prepared for a lot of finger licking and a drippy mess, so keep lots of napkins handy. My Mama used to say "if it ain't messy, it ain't good," and a good roast beef po'boy with gravy is a lovely kind of messy. Second - do not skip a single step in this process or the end result will not be the same. No skipping steps or ingredients. No substituting.

To make 4 half po'boys, or 2 big ole po'boys for some hungry folk, you'll need two large loaves of French bread and a 2 to 3 pound eye of round roast. If you need more, just increase the amounts as needed, or make smaller po'boys if you're feeding kids, or, say... making them for a party!

I prefer the eye of round because rather than shredding, it slices well, and slices nice and thin also.  You may have seen the cheater pulled pork that I boil - I know. Don't freak out! I do this roast for po'boys the same way, after seeing a segment on Diners, Drive-ins and Dives featuring Parasols, a New Orleans restaurant famous for it's roast beef po'boys. I wouldn't have believed it till I tried it, but I like it much better this way now.  It does actually go into the oven in a nice, hot tub of yummy gravy where it gets more tender, and infused with wonderful flavor, so don't be scared by it's paleness when it comes out of the boiling water - just have faith and hang in there. If it's good enough for Parasols, it's good enough for us.


Put the roast in a large pot and cover it with water, plus about one inch over that.  Then remove the roast and bring the pot of water to a full, rolling boil on its own.  Once the water is boiling, carefully return the roast to the water. When the water comes back to a boil, reduce the heat to a low simmer and let it simmer for about 1-1/2 hours. Don't let it boil.


Remove the roast from the water and set it aside to cool slightly, transfer it into a container to refrigerate and cool completely.  Reserve all of the cooking water.  Mix together the gravy seasoning - flour, Cajun seasoning, onion salt, garlic powder, salt and pepper. Looks a bit plain and dull doesn't it? Well, don't be deceived!


Add to that the canola oil and Kitchen Bouquet, and mix until it forms a thick paste. Kitchen Bouquet is a browning and seasoning sauce used to add richness to meats, gravies, and stews. The ingredients include caramel coloring, and a mixed vegetable stock, including carrots, onions, celery, parsnips, turnips, salt, and parsley. Use of it enables you to skip the roux browning process because it adds the color and flavor.

If Kitchen Bouquet is not available where you live, you will need to make a browned roux with the flour instead. To make a roux, warm the oil over medium to medium high heat, then add the flour and cook and stir until mixture darkens.  You can also make a roux using a microwave or in the oven.  Stir in the seasonings, and proceed. For more about making a browned roux for gravy, click right here. You can use this method to make your gravy instead if you prefer.


Transfer 4 cups of the meat broth to a large saucepan and bring it to a full boil; reserve the remaining broth. Quickly whisk in the gravy base, until fully incorporated and mixture is bubbly and thickened. 


Toss in a couple sprigs of thyme, reduce heat to a low simmer and let cook for 30 minutes, whisking occasionally.


Pull the roast out of the fridge and slice it very, very thin. Yes, yes... it looks pale and pitiful doesn't it? Just wait.


Preheat the oven to 325 degrees.  Set aside a cup of the gravy for later.  Grab a 9 x 9 inch baking pan and add a layer of meat to the pan.  Top the meat in the baking pan with a ladle or two full of the gravy.


Add another layer of meat and repeat with the gravy.


Continue layering until all of the meat and remaining gravy (except for what you set aside) has been put into the pan.  Cover the pan with aluminum foil and place into the heated oven for about one hour, turning the meat occasionally.


There are several varieties of French bread available and any one of them is fine.  Rouse's Market makes a mighty fine French bread that I really love but to be honest, we grab the French bread from WalMart's deli quite often too. You want a bread that has a nice crisp crust, but a fluffy, soft and tender (not dense) inside.


I like to toast the bread in a hot cast iron skillet first, and then spread mayonnaise on both sides of the inside of the bread.


Pile some of the roast beef on the bottom half of the French bread.  Top with sliced tomatoes and just a bit of kosher salt and fresh cracked black pepper.


Top with pickles, if desired.  I sometimes add pickles, sometimes I don't. Right now I am totally addicted to these Wickles pickles, and oh my gosh are they good on a roast beef po'boy!  So add them if you like them, or not.  Top that with shredded lettuce.


Close the top and put the entire po'boy back into the hot skillet and using a large spatula, gently push the po'boy into the skillet to press it. You can also top the po'boy with another skillet, or use a sandwich press, just take care that you are not squishing out all of the insides of your po'boy though. I don't press my roast beef po'boy as much as I would say a shrimp, ham and cheese, or crabmeat po'boy.  Turn the po'boy over and repeat. I forgot to get a pic of my "dressed and pressed" po'boy while I was pressing it in the skillet, so this is The Cajun's po'boy getting pressed in the skillet. He pretty much likes his po'boy with mayo and meat only {boring} but I made him eat a bit of lettuce too because it just looked too naked to me.  Once pressed, you can open the sandwich up and add extra gravy to it if you like.


Grab some chips and a good cold Barq's root beer in a bottle if you can find one, though a good, ice cold beer is pretty darned good too. Roll up your sleeves and get ready for some finger licking! Enjoy!


Share

Step by Step Homemade Mississippi
 Roast Beef Po'Boy with Gravy Parasol's Way
From the Kitchen of Deep South Dish

Before you start. Do not skip a single step in this process or the end result will not be the same. No skipping steps, no leaving out ingredients. No substituting, period.

The Bread

Use two large French Bread loaves, either homemade, or locally purchased. Around here, we often use a New Orleans style po'boy bread, like Leidenheimer’s, though a good deli French bread from the grocery store or super center works just fine too.  Substitute any long Italian or French bread loaf that is not too dense - you want it light and airy inside.

The Roast

1 (2-3 pound) beef eye of round roast
Water to cover, do not discard

Put the roast in a pot or dutch oven and cover it with water, plus about an inch.  Remove the roast and set aside.  Bring the water up to a full rolling boil on it's own, and then, carefully slide the roast into it. When the water returns to a boil, reduce to a slow simmer and let cook for about 1-1/2 hours.  Remove the roast, reserving all of the water from the broth; set aside.  Place roast into the refrigerator to chill for easier slicing. 

The Gravy

4 cups of the reserved broth from the roast, plus extra as needed
1/2 cup of all purpose flour
1/2 teaspoon of Slap Ya Mama, or your favorite, Cajun seasoning
1/2 teaspoon of onion salt
1/2 tablespoon of garlic powder
1 teaspoon of kosher salt
12 turns of the pepper grinder
1/4 cup of canola oil
2 teaspoons of Kitchen Bouquet
Couple sprigs of fresh thyme

Transfer 4 cups of the stock from the roast into a large saucepan. Bring to a boil.  Meanwhile stir together the flour, Cajun seasoning, onion salt, garlic powder, salt and pepper until well blended.  Stir in the oil and Kitchen Bouquet to form a thick paste.

Once the water is at a full rolling boil, quickly whisk in the paste and continue whisking until well incorporated.  Reduce heat, add thyme, and low simmer the gravy uncovered, for 30 minutes, adding more of the broth water to reach the desired consistency. Taste and adjust seasonings as needed.

Preheat the oven to 325 degrees.  While the gravy is simmering, remove the roast from the refrigerator and slice it into very thin slices.  Set aside approximately 1 cup of the gravy.  Place one layer of roast beef into a 9 x 9 inch baking dish and top with a scoop of the gravy.  Add another layer of roast beef, another scoop of the gravy, and continue layering until all has been put into the pan.  Be sure to pan all of the bits and imperfect pieces from cutting.  Cover the dish with aluminum foil and bake at 325 degrees for about 1 hour, turning occasionally, or until meat is tender.


Building the Po'Boy

French Bread
Mayonnaise
Sliced Tomato
Salt and pepper, to taste
Sliced dill pickles, optional
Shredded Iceberg lettuce

Divide the French bread into halves or the size needed, and slice each piece lengthwise. Try to leave a flat edge "hinge" intact if possible. It sort of helps to hold everything in. If you cut through or it opens up anyway, no big deal!  Heat a large cast iron or skillet, open the bread up and toast each serving on the inside.

Add mayonnaise to both sides of the inside of the French bread for each serving.  Add roast beef to the bottom half of the bread.  Top with sliced tomatoes; add salt and pepper.  Add pickles, if desired. Top with shredded lettuce, and place other half of the French bread on top.  Place back into the skillet, and using a wide spatula, press down while heating. You can also use a press, if you can control the pressure, or you can put a heavy skillet on top. I prefer to just press with a wide spatula so not to squeeze out too much of the gravy!  Carefully turn the po'boy over and repeat on the other side, toasting while pressing.

Transfer the po'boy to a cutting board and slice in half.  Open and add some of the reserved gravy if desired.  Wrap tightly in several sheets of white butcher paper, and serve with a side of Zapp's potato chips, an ice cold, bottled Barq's root beer and a lot of napkins!  Now that's genuine!  Course if you don't have access to those two amazing sides, we won't mind at all if you substitute. Barq's in a bottle have gotten kinda hard to come by even here sometimes and we didn't have any Zapp's in the house for this po'boy round.

Make it a Party:  Use pistolettes to make mini party sized po'boys or packages of small dinner rolls or party rolls to make mini roast beef sandwiches - something like King’s Hawaiian Sweet Rolls would be a good choice.

Source: http://deepsouthdish.com

Requires Adobe Reader - download it free!

Check These Out Too!

What Exactly Is a Po'Boy?
How to Construct an Oyster Po'Boy
Denver Po'Boy
Italian Beef for Sandwiches
Mississippi'd New Orleans Muffuletta

.

Bookmark and Share
Hey Y’all! Welcome to some good ole, down home southern cooking. Pull up a chair, grab some iced tea, and 'sit a bit' as we say down south. If this is your first time visiting Deep South Dish, you can sign up for FREE updates via EMAIL or RSS feed, or you can catch up with us on Facebook and Twitter too!
Articles on this website are protected by copyright. You are free to print, but do not repost photographs or recipes without prior written approval.
Click for additional information.

 
Related Posts with Thumbnails