 |
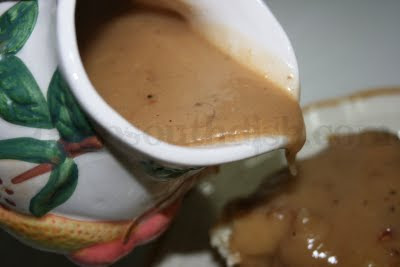
| Chicken Gravy made with bacon drippings & homemade stock |
How to Make Homemade Gravy
 If you want to learn how to make homemade gravy, here's another for the "how-to" series of posts here. I know of lot of my regular readers are foodies and certainly know how to make gravy, but I hope that those in search of info will happen across this and find some help. We all had to learn somewhere! I recently made a casserole in need of chicken gravy and just today made roast beef po'boys and needed a beef gravy, so a "how-to" seemed fitting.
Don't be intimidated by homemade gravy! It really is not at all difficult - if you arm yourself with a few tips and techniques - and guess what? Mistakes are generally easily corrected - meaning that unless you burn your roux or dump in a whole shaker of salt, you can fix them!
In a nutshell, you take equal parts of fat and flour, and cook the flour in the fat to make a roux, and then add somewhere between roughly 4 to 6 times that amount of liquid, depending on the thickness desired. Simmer for a bit, then add just a bit of seasoning and you've got a fantastic, flavorful homemade gravy.
The first picture above is a chicken gravy made with bacon drippings and chicken stock leftover from boiling chicken, then seasoned with kosher salt, fresh cracked black pepper, poultry seasoning and Cajun seasoning.
Working on holiday gravy? Click here for the how to on How To Make Homemade Giblet Gravy in the Roasting Pan.
 |
| Beef Gravy made with canola oil & boxed beef broth |
This second picture is a beef gravy, made with canola oil and boxed beef broth and seasoned with kosher salt, fresh cracked black pepper, Cajun seasoning, and a dash of Worcestershire sauce. I often use a bit of Kitchen Bouquet to give my beef gravy a richer color, but didn't do that this time. I know that they look similar, but they certainly have their own distinctive flavors.
 |
Recipe Tutorial: How to Make Homemade Gravy
©From the Kitchen of Deep South Dish
Prep time: 10 min |Cook time: 10 min | Yield: About 1 cup
Ingredients
Instructions
- One good quality heavy stainless or heat resistant non-stick skillet
- One long handled wooden spoon
- 2 tablespoons of fat
- 2 tablespoons of all purpose flour
- 1 cup of room temperature or warmed liquid
- A whisk
- Salt, to taste
- White or black pepper, to taste
- Additional seasonings, as desired & to taste
- Kitchen Bouquet, optional (for brown gravies)
Recipe is per cup. READ ALL INSTRUCTIONS INCLUDING THE TIPS BELOW, BEFORE STARTING! Making a gravy is easy, but it is a fast moving process.
Heat fat in a heavy skillet over medium high heat. Have your measured liquid at the ready, plus extra in case you need it.
Sprinkle in the flour a little at a time with one hand, while stirring briskly and constantly with the other hand, until all flour is incorporated and lumps disbursed. Reduce heat to just slightly over medium and cook for 5 minutes, stirring constantly and moving the flour mixture all around, including from the outside edges. Continue cooking until roux is a light to golden tan color, moving on and off the burner as needed to prevent burning.
Turn the burner down to just under medium and remove the skillet from the burner. With the wooden spoon at the ready in one hand, begin to slowly but steadily pour all of the liquid into the pan with the other hand, stirring briskly and constantly until it is blended in well.
BE CAREFUL! The roux will immediately bubble up and there will be a puff of steam, so unless you want a roux facial, don't be leanin' over the pan! The pan and the flour are very hot at this point, so you need to quickly disburse the flour and liquid around the pan so as not to burn it. Once all of the liquid and flour have been incorporated, return the skillet to the heated burner, grab your whisk and continue cooking on a medium simmer, stirring occasionally, for about 10 to 15 minutes, or until nicely thickened.
Add seasonings, and Kitchen Bouquet if desired, taste and adjust as needed. Keep warm over very low heat, or transfer to a gravy bowl for the table.
Directions are for 1 cup of medium thick gravy - use a bit of additional liquid for a thinner gravy. Double or increase ingredients as needed for desired amount of gravy. See tips below for info on fats, liquids and seasonings.
Tips
1. Suggested fats include canola oil alone or mixed with pan drippings, shortening, pure butter, or bacon fat. Pure butter works best, rather than margarine or whipped butters. Butter is the best fat base if you are making a cream sauce or gravy.
2. When using pan drippings, a fat separator comes in very handy and will keep your gravy from having too much fat in it. Pour off all of the fat from the skillet into the separator. Deglaze the pan with just a tiny bit of stock and pour that off into your intended liquid so that you have the pan scrapings in the broth or stock you are going to use.
3. Suggested liquids include bouillon or base, stock, or broth. Water works as well but should always be enhanced with either a base or bouillon. Never use water alone as it will dilute the flavor of your gravy.
4. Homemade stock resulting from cooked meats, such as a stewed or boiled chicken make an excellent and flavorful liquid base. Be sure to strain it before using it for your gravy.
5. To make a creamy gravy use whole milk if possible or a diluted evaporated milk, using equal proportions of water and evaporated milk works well. A combination of milk with another liquid such as base or bouillon enhanced water, stock or broth, also work well for a cream gravy.
6. If your gravy is too thick, continue stirring in additional liquid a little at a time until it reaches the desired consistency.
7. If your gravy is too thin, make a slurry of flour and water, placing a tablespoon of flour in with 2 tablespoons of cold water. Mix well with a fork. Add a couple of tablespoons of the hot gravy in with the slurry and blend. Whisk or stir the slurry into the hot gravy but take care not to drop in any undissolved flour lumps! Cook longer, about 8 to 10 minutes, so that the flour is cooked. Repeat if needed to reach thickness desired.
8. If your gravy has lumps, just strain it! Place a strainer of some kind over another container and stir to push it through. Return the strained gravy to the original skillet and heat it back up.
9. Be light with seasonings! Especially salt, and especially when using bouillon or packaged broths & stocks, since most already contain salt. Add a little at first, then taste and adjust. You can add more seasonings if needed, but you can't do much to take it away if you overdo it.
10. Suggested seasonings to use either alone, or in combination, might include, thyme, sage, tarragon, rosemary, parsley, chives, Cajun seasoning, cayenne pepper, hot sauce, dry mustard, horseradish, onion powder, onion salt, garlic powder, poultry seasoning, paprika, curry powder, lemon juice and white wine.
11. A splash of Worcestershire sauce can be added for a more robust flavor.
12. A splash of Kitchen Bouquet can be added to achieve a deeper color.
Source: http://www.deepsouthdish.com/
Requires Adobe Reader - download it free! ©Deep South Dish

☛ Are you on Facebook? If you haven't already, come and join the party! We have a lot of fun & there's always room for one more at the table.
Homemade Southern Sausage Gravy
Chorizo Sausage Gravy
Southern Style Milk Gravy
Southern Homestyle Tomato Gravy
Images and Full Post Content including Recipe ©Deep South Dish. Recipes are offered for your own personal use only and while pinning and sharing links is welcomed and encouraged, please do not copy and paste to repost or republish elsewhere such as other Facebook pages, blogs, websites, or forums without explicit prior permission. All rights reserved.
Material Disclosure: Unless otherwise noted, you should assume that post links to the providers of goods and services mentioned, establish an affiliate relationship and/or other material connection and that I may be compensated when you purchase from a provider. You are never under any obligation to purchase anything when using my recipes and you should always perform due diligence before buying goods or services from anyone via the Internet or offline.
.